How to Dry Your Own Corn Stalks for Fall Decorating in 4 Easy Steps (with Pictures)
Drying Corn Stalks Is Easier Than You Might Think
Last year, I spied corn stalks for sale at our local Home Depot and Lowes stores and wanted to buy some for our Fall decorating, but sticker shock deterred me. Each small bundle cost nearly $25!
Amazon, which typically offers better pricing, is selling bundles of 12 this year for $52.99. Considering these bundles will either be composted or sent to the landfill at the end of the season, only people with money to burn would consider investing in such pricey lawn décor.
The best solution is to dry your own corn stalks. If you grew corn in your garden over the summer, it won't cost you a dime, and you'll be harvesting every bit of your crop.
We tied our dried corn stalks to tomato stakes to help them stand in our display.
Step One: Harvest the Corn & Cut Each Stalk
Once you have picked all the corn your garden has produced, waiting for stalks to dry out on their own will take too long.
You will need a tool to make a clean cut at the base of each stalk. A branch cutter is ideal for this job because the blades encircle the stalk and fell it in one snip.
If you notice your corn stalks are not uniform in size, be sure to sort them as you go so each pile is the same height.
Cut each stalk at the very base.
Step Two: Tie Corn Stalks into Bundles
Once you've sorted all your stalks by size, it's time to tie them together. Some people suggest hanging each stalk separately to dry, but that takes a lot of time and space. If you tie too many stalks together, however, they take longer to dry, especially the ones squeezed in the middle.
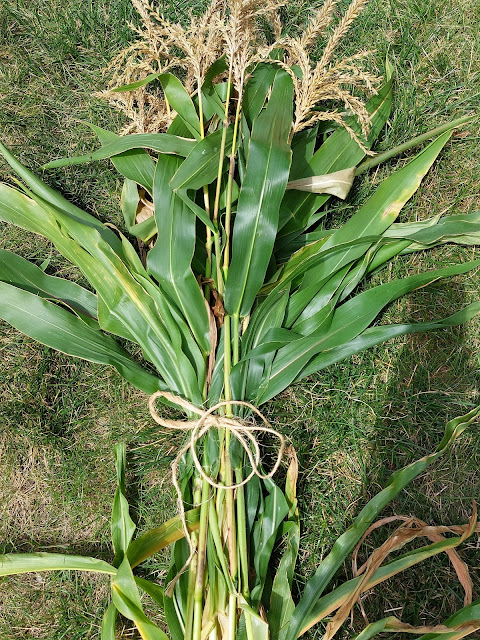
Group your stalks in bundles of 4-8, depending on how tall they are. If your stalks are thick and 6-7 feet tall, only tie four together in a bundle. Short and skinny stalks can be grouped together in clumps of 6-8.
The corn from our garden was short and thin, so we grouped them in bundles of 6-8.
Using twine, tie each bundle approximately a third of the way down from the top. You don't have to be exact, but your tie should be above the halfway point on the stalks. It should be firm and secure but not overly tight. If your twine is too loose, the stalks can slip as they dry, but if they are strictly bound, it could damage them and extend the drying time.
Step Three: Hang Corn Stalks Upside Down
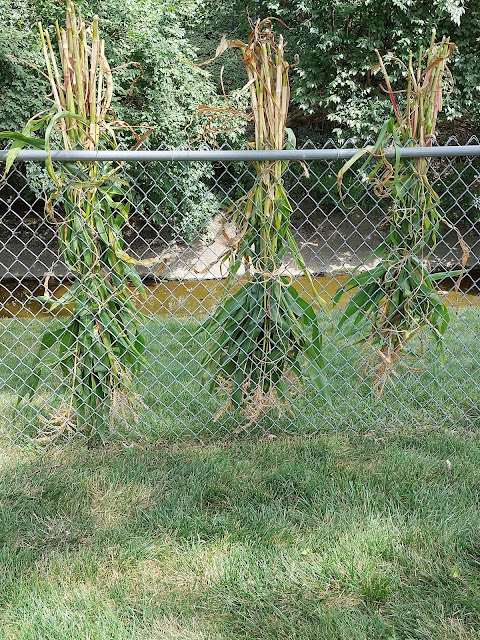
Once your bundles are secured, they will need to hang upside down in a dry space for about a week before they are ready to be used for decorating. Ideal spaces for drying include a shed, garage, or even basement. We hung ours outside on our chain-link fence, but only after we made sure no rain was forecasted for the week. Moisture impedes the drying process, so it's best to hang them in a shed or garage, if possible.Although we hung our corn stalks outside to dry, finding space in your garage or shed is better.
Why must you hang your stalks upside down to dry? Doing so helps them maintain a better form. Plus, it aids air circulation through the leaves and stems to prevent mold and rot.
Step Four: Use Your Dried Corn Stalks for Decorating
Once your stalks are completely dry, decide where you want to use them in your outdoor Fall decorating. If you need thicker clumps, simply untie your bundles and group more of them together before retying them with twine or a pretty bow.
How can you get your corn stalks to stand? Unless you are leaning your corn stalks against something for support, you may have trouble keeping them upright.
We used our corn stalks in a flower bed by hay bales, and they were too flimsy to stand on their own. We simply pounded a tomato stake beside each bale and looped the tie holding the stalks together over each stake before fluffing and fanning them. If you're placing stalks against a tree, lamp post, railing, or pillar, you can also use twine to tie them up--no one will notice the twine from the street, especially if you conceal it under the leaves.
If All Else Fails.....
If you've already cut down your corn, many garden centers and farmer's markets carry corn stalk bundles for decorating. You can always try drying your own next year. If you end up with more than you can use, consider selling what you don't need to earn more than enough money to cover next year's seed costs.
Join Our Facebook Group!




.png)


Comments
Post a Comment